Capturing stunning photos of dogs is a rewarding adventure. At the same time, there are a lot of speed bumps that contribute to dog photography mistakes.
If you have run into those impediments to great photos, this article is for you. We take aim at the low hanging fruit of mistakes. Then, at the end, we have added great information and tips with frequently asked questions (FAQs). There’s a lot here to unpack.
If you want to up your game, let’s dig in!
Most common dog photography mistakes (and some great ideas to fix them)
1. Using the Wrong Camera Settings Leads to Dog Photography Mistakes
Many beginners rely on automatic mode, which often results in blurry images or poor exposure for subjects that move as fast as dogs.
The fix: Switch to manual or semi-automatic modes (such as shutter priority). Use a fast shutter speed to freeze motion (1/1,000th of a second or faster) . Adjust ISO and aperture accordingly—lower f-numbers (like f/2.8–f/5.6) help create a beautiful background blur while keeping the dog in focus.
2. Avoid This Pet Photography Fail: Ignoring the Dog’s Personality
Every dog has a unique personality, and failing to plan for it can result in generic or lifeless photos.
The fix: Read the room, so to speak. Observe the dog before the session. Is it playful and energetic? Use action shots. Or, is it more chill/relaxed? Go for close-ups that highlight expressive eyes. Be in tune with your dog.
3. A Dog Photography Slip-Up: Failing to Focus on the Eyes
The eyes are the soul of a great pet portrait or action shot, and missing focus here can make a photo feel lifeless.
The fix: If you are planning on action shots, use continuous autofocus (AI-Servo for Canon, AF-C for Nikon/Sony). This feature will greatly improve the odds of getting the eyes in focus. If you are planning on portraits, switching to single focus mode should work fine. The photo below is one of our favorites. How about those eyes?
Check out our article on action pet photography. And if you’re in the market for a new camera, check out this article from Amateur Photographer on the best cameras for action and sports.

4. Not Getting Down to Their Level
This may be the biggest mistake people make on a pet photoshoot. Shooting from a standing position, which is your point of view, often results in dull and disconnected images.
The fix: Get down on the dog’s level for that perfect shot. Shooting at eye level makes the viewer feel more engaged with the dog. If needed, lay on the ground or kneel for a more intimate perspective. Here’s a pro tip: invest in a great pair of knee pads. Best purchase ever!
5. Use Natural Light to Create Great Scenes
Outdoor light for photography is simply the best.
The fix: Avoid midday sun if possible. With the sun overhead comes harsh, strong shadows. The best times of day are the first two to three hours in the morning and the last two to three hours in the afternoon. These are the golden hours, when warm colors such as reds and oranges are prominent. If shooting indoors, position the dog near a window for soft, diffused light. Avoid using a flash, as it can startle the dog and cause unnatural reflections in their eyes. And last, don’t let cloudy days scare you. Diffused light through clouds actually accentuates some features of the dog that may be in shadows on sunny days, e.g. eyes and fur.
Learn more in our article about the benefits of natural light.
6. Forgetting About the Background
For dog photography mistakes, ignoring the background this is a big one for many people. A cluttered or distracting background can take attention away from your furry friend.
The fix: Choose a simple background that complements the dog’s color and personality. A blurred background (achieved with a wide aperture = small f/stop number) keeps the focus on the dog while eliminating distractions in the background. For outdoor photos, we like parks and wooded areas as well as open spaces like fields.
Check out the background in the photo below. It was busy with shrubs and leaves, but we made it disappear with the right camera settings (and a little help from Lightroom).
7. Lack of Patience Kills Many a Photoshoot
Dogs are unpredictable, and rushing the process can lead to disappointing results. For what it’s worth, rushing the process photographing any wild animal or bird leads to disappointment.
The fix: Bring treats or toys to keep the dog engaged. Wait for the right moment rather than forcing poses. If a dog is anxious, take breaks to keep them comfortable. Pay attention to their body language. Most dogs warm up to a new environment in 20-30 minutes, as long as the owner is with them.
8. Dog Photo Fails: Not Considering the Dog’s Comfort
This is one of the most common dog photography mistakes. They focus on getting that perfect shot and forget that the “talent” may not be of the same mind. Uncomfortable dogs won’t pose well, and it will show in the photos.

The fix: Choose locations and positions that the dog is familiar with. Avoid forcing them into unnatural poses. If they seem stressed, give them a moment to relax and re-charge. Re-read #7.
9. Overlooking Action Shots (Our Favorite)
Many pet owners stick to still poses, missing the dynamic side of their dog’s personality. It’s always helpful to have an “assistant” for action shots. They can throw balls and toys while you (or us) create photographic magic. If you hired us to photograph your dog, we would encourage you to be our assistant!
The fix: Cameras today all have settings designed for action photography. The most important is using continuous shooting (versus a single shot at a time). Depending on the camera, that could give you 10, 20 or more shots every second. Consequently, this will greatly increase your chances of getting a great action shot. Also, some cameras have focusing features that can seek out a pet’s eyes. Play fetch, have them run toward the camera or capture mid-air jumps to add energy and life to your photos.
Check out this solid article of the best cameras for action photography. If you’re curious, here is the camera we use: the Nikon Z9. This camera has made a world of difference in our action photography results. See our birds of prey and wild horses galleries.
10. Skipping Post-Processing
Don’t be afraid of this. Mobile phones have brought these features to the masses and it’s really easy.
The fix: The most well-known photo editing programs are Lightroom and Photoshop, both products from Adobe. Both programs have amazing capabilities, but they can also be used by amateurs. There are about six to eight adjustments that can turn your “meh” photos into works of art. We use these adjustments the most: exposure, highlights, shadows, contrast, color and sharpness. Learn more in our quick guide about these amazing photo editing programs.
In closing, avoiding these common mistakes will instantly improve your dog photography skills. With the right settings, patience and awareness of your surroundings, you’ll create beautiful, professional-looking images that truly capture your dog’s spirit. So grab your camera, find some good light and start shooting!
Frequently Asked Questions to Overcome Dog Photography Mistakes
The following FAQs primarily target those with digital or mirrorless cameras. These cameras have a wider range of features and capabilities than, for example, smart phones.
Basic Camera Settings and Exposure: Great Photographs Start with a Strong Foundation
What is the exposure triangle in photography?
Common dog photography mistakes start with a lack of understanding of the exposure triangle. In simple terms, it is the combination of adjustments of aperture, shutter speed and ISO that determine how well a photograph is exposed. Each of these three is explained in more detail following. Taking pictures is not as easy as falling off a log, so dig in on some of these important nuggets of information.
What is Aperture (f-stop) in photography?
Aperture (or f-stop as it is sometimes called) is the opening in the lens that controls how much light enters the camera. A lower f-stop (e.g., f/2.8) creates a blurry background, while a higher f-stop (e.g., f/11) keeps more of the image in focus. For dog photography, we always use a low aperture/f-stop number to ensure the emphasis for focus is on the dog.
How is shutter speed used in dog photography?
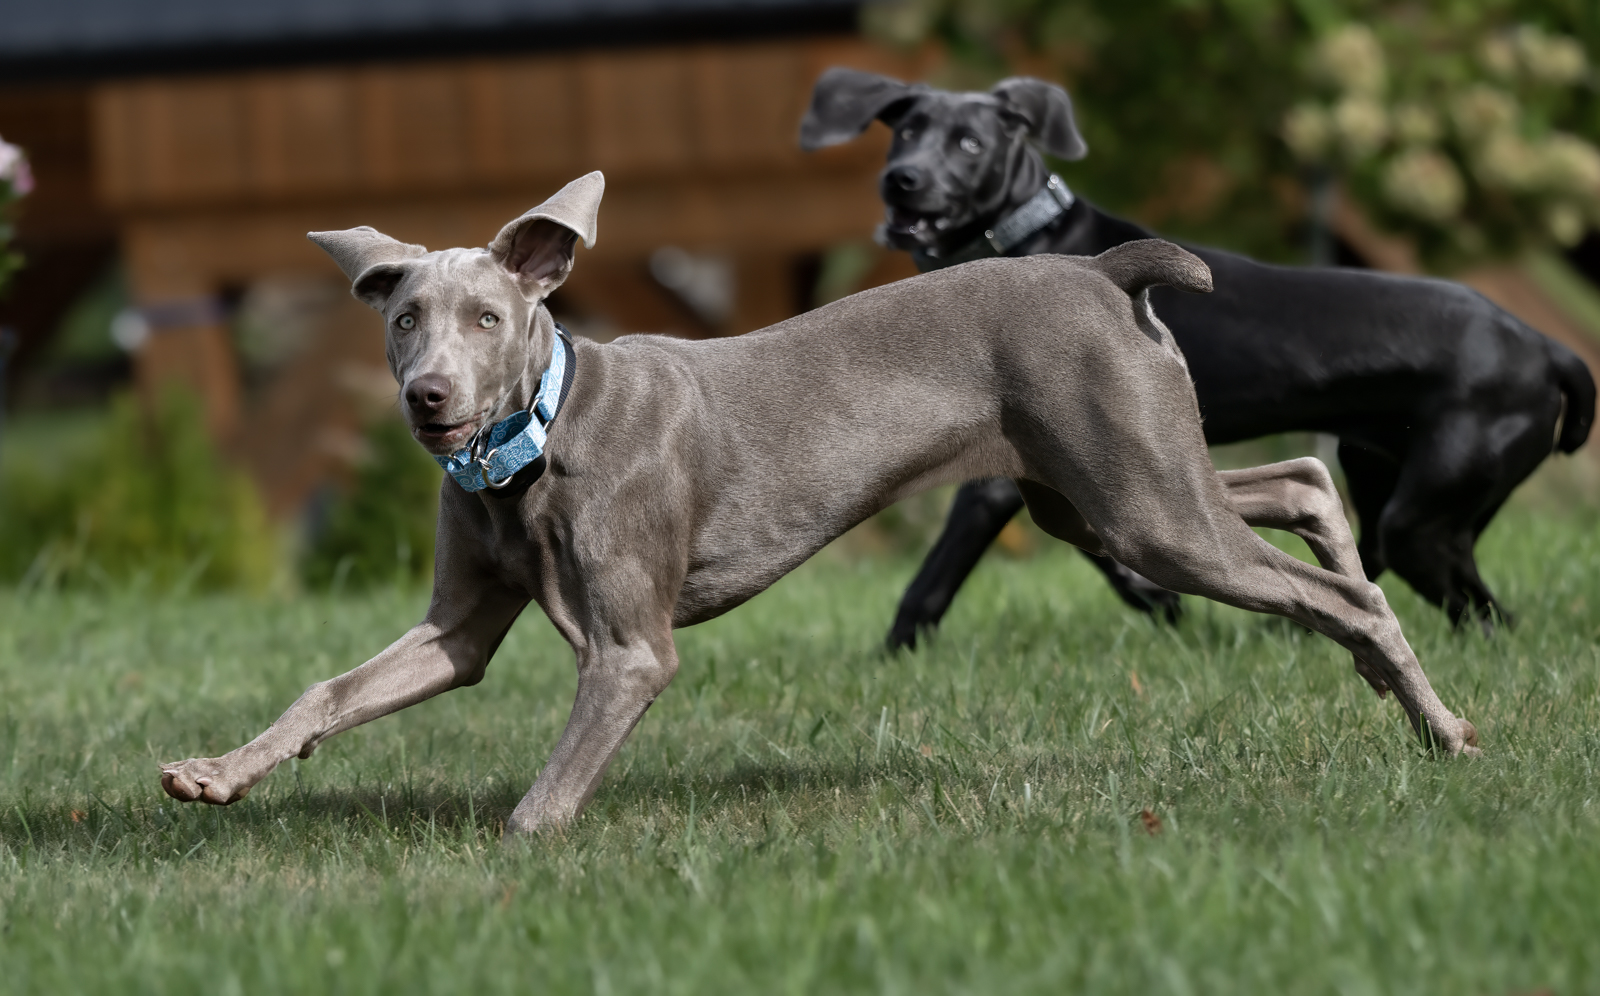
Shutter speed controls how long the camera’s sensor is exposed to light. Fast shutter speeds (e.g., 1/1000th of a second and faster) freeze motion, making them great for your furry friend. Slow speeds (e.g., 1/30th of a second) can create more blur in the photo. It’s not uncommon for me to use 1/2000th of a second, especially if the natural light that day is good.

What better example than to show my favorite action dog photograph. The camera settings were designed to focus on the lead dog’s eyes, which they did. That left everything else out of focus, including the young pup in hot pursuit. But that is what we loved about it. The focus and emphasis is on Gracie. But it’s crystal clear what’s going on with Ellie in the background.
What is ISO?
This is confusing for many beginner photographers. ISO controls the camera’s sensitivity to light. A low ISO (100-400) produces cleaner, higher quality images. A high ISO (1600+) helps the camera perform better in low light situations, but often adds a grainy look (e.g. noise) to the image. The noise can be improved with photo editing software.
What is white balance and how does it impact dog photos?
It does just what it suggests. It allows for the adjustment of the white components of a photograph (e.g. your dog’s fur or clouds) to ensure that all other colors look natural. For example, any time the white’s in a photo look a little too blue or orange, it is likely the white balance is off.
What is the best metering mode for dog photography?
Most cameras offer a wide variety of metering options or modes. The three I use most are evaluative/matrix, center-weighted and spot metering. For dog photography, evaluative or matrix metering is often best for balanced exposures. However, spot metering can be useful when photographing dogs with very light or dark fur against contrasting backgrounds.
How does exposure compensation help in dog photography?
Exposure compensation is a great feature and I use it all the time. It allows you to override your camera’s automatic exposure settings. I always evaluate the first few photos I take to see if I need to compensate the exposure. Situations like bright skies, snow and light-colored dogs can sometimes trick the camera’s metering system.
Focus and Composition: Lessen Dog Photography Blunders
What is autofocus (AF) and how is it used?
With the simple push of a button on the camera (or touch of the screen of a smart phone), autofocus ensures that what the camera is pointed at will be in focus. This is a critical component for a dog photographer. There are two basic types of autofocus settings. One, is continuous AF (AI Servo or AF-C, depending on the make of camera). For example, this tracks moving dogs. Two, is single AF (one-shot or AF-S). This is typically used for subjects that don’t move or move very little, such as landscapes or pet portraits.
What is depth of field?
It is the range or part of a photograph that appears in focus. A shallow depth of field (using a wide aperture on the camera lens such as f/2.8) will only focus on a portion of the dog. In this example, the photographer would want only the dog’s head and, possibly, a portion of its body to be in focus. This style would make the dog stand out from the background.

A deep depth of field (using a smaller aperture such as f/16) will allow for more of the scene to be in focus. Landscape photography typically uses a deep depth of field to have more of the landscape in focus, e.g. a grove of aspen trees in the mountains. For pet photography we seldom use settings that allow for a deep depth of field because we want all the emphasis to be on the dog.
What is bokeh in relation to exposure?
It is the pleasing, blurry background effect achieved by using a wide aperture (e.g., f/2.8). This helps isolate the dog from distracting backgrounds. Look at the beautiful blurry background that is not distracting us from seeing all the beautiful features of Luna.
What is the rule of thirds in photography?
This really isn’t a “rule,” but it leads to a lot of dog photography mistakes. Think of it as a guideline. It is a composition technique where the subject is placed along imaginary grid lines that divide the frame into thirds both vertically and horizontally. This often creates a balanced and visually interesting image.
What are the leading lines in a photograph?
These can be any object or effect that encourages the viewer’s eye to move throughout the photograph. For example, a path or fence can be a leading line. I’ve often taken photos of my dogs from the back as we are walking down a beautiful path or road. Not only does the photo show the dog, but it shows where we are going. Paths and roads are also used extensively in landscape photography.
What is eye autofocus and why is it important for dog photography?
Many modern cameras have an eye detection feature that detects and locks focus on a bird or animal’s eye. This is crucial in dog photography because a sharp eye makes for a more compelling and professional image. This is the most effective feature for wildlife and pet photography in my more than 50 years of photography.
What is negative space in photography, and how can it enhance pet portraits?
Negative space refers to the empty or less busy areas in an image that surround the subject. Additionally, it is sometimes called white space. Using negative space can help draw more attention to the dog, create a sense of scale, and improve overall composition. Bottom line: don’t feel pressured to fill up every nook and cranny of a photograph. White space is a good thing!
Motion and Action Photography: Avoid Common Mistakes
How can burst or continuous shooting mode for action shots lead to fewer pet photography errors?
A lack of understanding of this leads to a lot of dog photography mistakes. This is a setting that allows the camera to take multiple photos in quick succession. This greatly increases your chances of capturing the best photo when the dog is running or jumping. It is common for today’s mirrorless cameras to have the capability to take 20 or more photos per second. When combined with autofocusing, this capability greatly increases the chances of capturing the best photo in a series.
How can you capture sharp action shots in low-light conditions?
Fast-moving dogs need fast shutter speeds, but in low light, that can be challenging. Remember, even today’s best cameras are not as good as our eyes in low or extreme lighting conditions. To counter this, you may need to increase ISO, use a wider aperture, or add artificial lighting. A camera with good low-light performance can also help. Also, using photo editing software like Adobe Lightroom or Photoshop can help improve the impact of low light.
See our article on using editing software to improve your pet photography.
What is back button focus and how can it improve dog photography?
This is just the best camera feature ever. Most cameras today utilize the shutter release button for establishing focus of a subject. Back button focus separates autofocus activation from the shutter button. This technique allows for faster and more precise focusing, which is particularly useful when tracking moving dogs.
What settings should I use for pet photography?
There are at least two answers to this.
First, let’s address action shots. Set it to shutter priority, which will tell the camera to not change that setting when light conditions change. You must be in a continuous autofocus mode (some cameras will name it differently), which will give you the most flexibility. Your lens should be set to its smallest aperture number, e.g. f/2.8. Use eye tracking if your camera has it. And, set your ISO setting to the lowest number possible once your shutter speed and aperture are set.
Second, for non-action or still shots, you can use single shot mode, which takes one photo at a time. Set for aperture priority so you can control how much of the subject is in focus. And, again, the lowest ISO possible as long as the light conditions allow for it.
What is panning with a camera?
This is a technique where the photographer follows a moving subject with the camera. There are two often-used situations for panning:
- Create motion blur in the background using a slower shutter speed. For example, a dog running across your field of view will be in relatively sharp focus, but the background elements will be blurred.
- Everything is in focus. That’s when you use a fast shutter speed, such as 1/1000th of a second or higher.

Lighting and Image Quality: Ideas to Cure Your Dog Photography Mistakes
What is the golden hour in photography and why is it so important?
There are two moments in a day that are golden to an outdoor pet photographer: The hour (or two) after sunrise and before sunset. This is when natural light is soft, warm and flattering for dog portraits and dog action photography. These two times of a day are why we love sunrise and sunset photos so much (and it is perfect for pets, too).
Why do photographers dislike shooting in midday sun?
As fantastic as golden hour light is, midday light–especially on bright, sunny days–is difficult for two main reasons. First, the strong, overhead light casts harsh shadows. Second, the strength of that same overhead light creates harsh highlights. Imagine a white or light-colored dog, where the dog’s eyes are in deep shadows and its beautiful coat is completely washed out by the harsh sunlight. While editing software can help, it can’t completely erase the less-than-ideal impact on the image.
What does the dynamic range of a camera mean?
Dynamic range is the difference between the brightest and darkest parts of an image where details are still visible. Cameras have different dynamic ranges. Not surprisingly, more expensive cameras typically have wider dynamic ranges. A camera with a wider dynamic range can capture more details in photographing black dogs in the shadows and light-colored dogs in the highlights. A camera with a lower dynamic range will not be able to record those details. While cameras today are amazing, they still can’t duplicate the dynamic range of a human’s eye.
What is fill light and when should you use it?
Fill light is a secondary light source (like a reflector or flash) used to reduce shadows in a photo. When dogs are most active their heads are typically low to the ground. Fill light will help fill in when their eyes are shadowed.
How can you use natural reflectors in dog photography?
Natural reflectors, like sand, snow, water, or light-colored buildings, can help bounce light onto your dog. They will brighten the dog’s face and reducing harsh shadows.
Post-Processing and File Types
What is a RAW image and how is it different from a JPG image?
RAW files capture all of the data a camera can produce. For example, today’s top-of-the-line mirrorless cameras record up to about 60 megabytes of information per photograph. That means each photograph contains roughly 60 million pixels per photograph. When a RAW file is processed through photo editing software like Lightroom, it means Lightroom has access to all 60 million pixels for it to adjust.
JPG files are compressed images from a RAW file. For example, using the RAW file example above, the JPG version of that file might be only 10 megabytes. That means Lightroom has roughly 20% of the pixels in which to adjust an image. It’s worth noting that RAW files are considered lossless, which means they can be resized
Today’s smart phones, such as an iPhone, now provide the option for RAW photos.
What is “noise” in a photograph?
We’ve all seen it and not known what we were looking at. Noise–or that grainy look–is what you often see in older photographs from film. It is those unwanted speckles in an image, often caused by using a high ISO setting in low-light conditions or enlarging a photo to see something small, e.g. bird flying.
No matter the cause, grain in a photo is like fingernails on a chalk board to most photographers. While many of today’s cameras are excellent at managing grain, it remains an issue. Luckily, processing software like Lightroom and Photoshop
What does cropping a photograph mean in pet photography?
Cropping is a photographer’s best friend in the editing process. It lets you reshape a photo to better emphasize the photo’s main subject. Along the way, cropping can also help you remove unwanted parts of an image to improve composition or to focus attention on the dog.
What is the difference between lossless and lossy file formats?
RAW files are lossless, meaning they retain all the data for editing. Here’s why this is important. Photos often get edited, resized and changed many times as editing software capabilities improve. No matter how many changes, these files will not degrade like lossy files.
JPG files are lossy, meaning some detail is permanently discarded to reduce file size. Also, lossy files such as JPGs will degrade over time with editing and resizing.
For professional-quality editing, RAW is preferred.
How can you remove color casts from dog photos in editing?
Color casts (e.g., a blue tint in the shade or an orange hue from artificial light) can be corrected using the white balance tool in Lightroom or Photoshop. Adjusting the temperature and tint sliders can help achieve natural colors.
What are some quick editing tips for improving dog photos?
- Adjust exposure and contrast for better clarity.
- Use the dodge or masking tools to brighten the eyes.
- Reduce noise if the image was shot at a high ISO.
- Crop using the rule of thirds for better composition.

Todd Gurley: Better Late Than Never
Todd Gurley is a photographer who has come to the professional party late, but has had a big boy camera since he was 14.
Todd’s love of photography always had an outdoor focus. It started with sports, evolved to landscape, and then wildlife and birds.
And now pets!.
Based in St. Louis, Missouri, but an Arkansan at heart, Todd lives with his partner in crime of 50 years Sheila and about 250 pounds of dogs. They have two golden retrievers named Gracie and Ellie and one black lab named Norman. And bringing up the rear is an additional 10 pounds from Sally the rescue cat. She’s in charge if you are wondering.
Todd has this other business with his son Drew called Redbird Advisors. Oh, and he now has this website which was first discussed 25 years ago.
No wine before its time!
P.S. The photo above was taken on our way to the summit of Mt. Quandary, a 14,271-foot peak in the middle range of the Rockies, south of Breckenridge. Colorado. There are 58 named “14ers” in Colorado, the most of any state.
You must be logged in to post a comment.